Tuesday, 26 March 2013

Mini Amigurumi - Book Review

Mini Amigurumi by Sara Scales


I was very happy to be sent this book to review as I do love amigurumi.   I am not a natural crocheter, but have been a knitter since a child and have taught myself crochet in the last few years.   Everytime I return to crochet after a few months break I have to more or less re-learn how to do it.  But I do enjoy crochet and I love amigurumi as I can crochet, crochet, crochet and often there is little sewing up (which I hate!).

This book has patterns for lots of mini creatures and hearts, and toadstools.  I thought I would try one of the simplest things plus I only had one colour of thread to use! 


The smallest crochet hook I had was 2mm, and the book does recommend 1mm and uses 1mm for its patterns. However, there is a really good and useful Techniques section which gives the photos of the sizes if you used different hooks and yarn, so you can use whatever size you want it just will not be as mini.   The mini things can be used in jewellery and do look very sweet as earrings, brooches or on keychains.

The one thing I would ask is that book writers and pattern writers please tell me where to put my hook to  make a stitch, and (forgive me if Sara Scales the author did and I just did not notice) I had to look it up on the internet.

Amigurumi Dog from Mini Amigurumi by Sara Scales


Amigurumi Dog from Mini Amigurumi by Sara Scales


Rear View of Amigurumi Dog from Mini- Amigurumi by Sara Scales


I did have to do some sewing up and it was not horrible at all as all I had to add were ears and a tail to my little dog. But I enjoyed the whole thing so much that I plan to make a little bear next and he has more things to sew on.  I am very happy with the results and the little dog is very sweet.  I was surprised by how much I enjoyed using such a small hook and thin thread.  Now armed with more thread I hope to make more. I can recommend this book as the patterns and great fun and the instructions easy to understand.  I think some previous crochet experience will be needed but not much.

Friday, 22 March 2013

Pigs Galore

I thought it was about time I had a photo of my pigs all together.

So here they are:

You can buy my tiny pigs from my etsy shop and my folksy shop.

 And this next one is of the pigs with a new friend.

 And I will tell you more about him in my next post.

Monday, 18 March 2013

Giveaway Winner

The giveaway has ended (you remember this one here).

I asked small girl child to choose a number between 1 and 4, and she chose 2.

So the winner is LUCY W.  Well done, Lucy.  Contact me with your address and you will be sent the pattern.

Wednesday, 13 March 2013

Perfect for the Cold Weather - and this pattern could be yours!

Brrr..it is jolly cold out there.   So what more could you want to keep out the chills than this super ...thing.


Also called 'scooter style' this ..whatsit will keep you warm as you walk, cycle, run or scooter out and about.

And for you lucky people, I am giving away this pattern. How lucky can you get!

It is a vintage 1960s pattern. You can make 3 different sizes of ..headwear - 3/6 years, 7/10 years and adult.  So your children can wear one too!   It is knitted in double-knit.

To win this pattern (which is the original not a copy) then leave a comment. Any comment will do (except you naughty spammers), but for fun you could tell me what colour/s you would make it in.  Closing date is midnight GMT Sunday 17th March 2013.

Thank you and good luck!

UPDATE MONDAY 18 MARCH - COMPETITION IS NOW CLOSED.

Sunday, 10 March 2013

World Book Day 2013 - A Witch but not just any witch.


Here we are again. World Book Day.

Now we thought Mary might go as Cleopatra, she said she wanted to. And I was designing the outfit in my head.  But then I forgot when World Book Day was.  

One evening I had a text from Mary's friend's mum asking if Mary wanted to go with them to buy things for the Julia Donaldson costume for World Book day.   'What Julia Donaldson costume?' I texted back (or words to that effect).  Well, it turns out that this year the school had decided the whole school had to dress up as a character from a Julian Donaldson book.   

I was a bit annoyed for various reasons.  Looking back now I can see that it might put a halt to the 'Disney Princess dress-up' of previous years.   However, at the time I was angry because I thought it was supposed to be the child's favourite character from their choice of books. I also was angry because Mary stopped reading Julia Donaldson ages ago.  

I was mostly angry because this was two days before World book Day and my child had not been given the letter informing us of the school's decision.

So easy option  -  go as a witch. We had witch stuff.  But, you know me, it cannot be any witch. No, it has to be THE witch from Room on the Broom.  So my shopping, sewing, making instinct that every parent has come dressing up day, came into the fore. GO MUMS!!

Here is the book witch:


Here is our Witch:


Yes, I made the skirt (complete with blue dots all over it); yes I made the brooch; yes I made the hair and stuck it onto the hat; yes I put red dots all over the yellow ribbon; yes I glued gold sequins to the star on the wand. She did have a black cloak but we forgot to take the photo of her wearing it.

I am sorry if I appear a bit proud of myself but frankly I am.  The lovely red cardigan is handmade by my mum. 

There were plenty of witches at the school, but there was only one witch who was THE witch.

Bring on World Book Day 2014, baby. 


(*cries*)

Thursday, 28 February 2013

Special March Promotion Free Shipping to Uk buyers

All throughout March you can get free p&p in my etsy shop.   All you have to do is quote the special code FREEMARCH13  on checkout.


Not only me, there are fantastic sellers also taking part so do have a look at their work here.http://www.etsy.com/search?q=uketsypromo0313&view_type=gallery&ship_to=GB


GO SHOP!!

Tuesday, 26 February 2013

Felt Roses On a Stem, and a Corsage - Tutorial


In a previous post, this one,   I showed you how to make a simple felt rose that could be used as a brooch. Today I am going to show how the same technique can be turned into a rose on a stem to put in a vase, and also turned into a corsage.


 You will need:


Felt, wire (I used florists wire but you could use an alternative and children can use pipe cleaners), florists tape (or an sticky tape), thread for sewing, and scissors, and a brooch back for the corsage.


Cut a square of felt.  I have not specified how big as it is up to you and you can experiment with the size.  However, I cut one sheet of felt (approx 9" x 9" (23 x 23 cm) ) into four. And my square (which is probably more of a rectangle) is one of these.


Cut the corners off, so that they now curve.


 Now you need to cut a spiral.  This will make the shape of your roses. I made two roses:  the first uses the top spiral, and for the second I wanted to make a thicker, smaller spiral. I hope you can see the differences.   
When I made these with children the great thing was that each child's spiral was different meaning their finished rose was different. So from the same basic idea they had something individual.


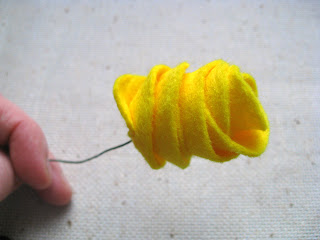
Take the first bit which is the outside edge (where you first started cutting).  Wrap tiny bit round the wire and sew it on.

Bend the tip of the wire over.


It is important that you now twist the wire. If you do not then the rose could slip down the wire.


Keep rolling the felt spiral round the wire. Keeping the bottom bit in line.  Every now and then sew a few stitches through all the layers of felt - but just at the bottom.

Keep rolling and sewing. 


You may have to pinch the bottom, or draw the stitches tighter to bring the bottom in and tighten it up so it is not too loose.


 Remember to sew through all the layers at the bottom.


When you get close to the end of the spiral of felt, you do not have to keep it in edge with the rest of the flower. Bring the next bit down as you roll and this will cover the last few twists in the wire and your (certainly my) messy stitches.


You will need to bring the last bit of the spiral over to cover the bottom and sew it on.


Your rose is now complete.


I had a long piece of wire so I just sewed another rose on the other end and then bent it and then popped it in a vase.


How to Make a Corsage 

You will need felt roses on a stem, brooch back, and florists tape.

Twists the two roses together in a way that you want them to look.


Begin to wrap the florists tape round the stem.


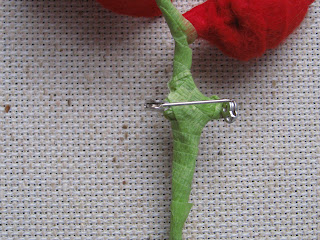
Keep wrapping as you work up the stem, to the bottom of each rose and then back down to where you want to position the brooch back.


Put the brooch back on opened.  Wrap the tape over one way and then the other a couple of times to hold the brooch back in position firmly.


If you want to hide the brooch back then you can always add a few felt leaves (or use any material you want).


I just put these in the front so they hide the brooch back and wrapped them with the tape.


The tighter bud rose was made in the same way but I moved the edges of the felt down a bit when rolling instead of keeping them in line with the last edge.
UPDATED 5 March 2013 - Of course, as my sister pointed out, you could always put the brooch back on longways in which case you probably do not need the leaves to hide it!

So there you go.  Two tutorials for the price of one!  Please excuse the glue on my hands. This was my first time using florists tape and I found it very easy, so do not be put off. But if you cannot get any then you can use and tape, or even strips of green felt and glue or stitch them on.

I hope you have enjoyed reading this and will have a go yourself.  I would love to hear any comments so please do leave some.  I do moderate to keep out spam.  Also do leave links to any photos as I would love to see the roses that you make.